The thought of installing a new 3D machine control system can be daunting. Complex wiring looms, the fear of placing a sensor incorrectly, and the costly downtime that comes with any on-site error are valid concerns for any professional operator. But preparing your excavator for the demands of 2026 and beyond doesn’t have to be a source of stress. A successful FJDynamics gps installation is the first critical step towards achieving centimetre-level accuracy, and we’re here to ensure you get it right first time, every time.
As a trusted, family-run training provider, we believe in empowering operators with expert knowledge. This comprehensive guide will walk you through the entire process with professional, step-by-step instructions. You will master everything from correct hardware mounting and sensor placement to achieving a seamless RTK signal connection. By following our dependable advice, you can confidently complete the installation, minimise downtime, and prepare your operators to use the new interface with skill and precision on your UK construction projects.
Key Takeaways
-
Learn the essential pre-installation checks, including the non-negotiable requirement for flat ground and the specific tools needed for a successful calibration.
-
Understand the precise mounting locations for dual GNSS antennas and IMU sensors on your excavator’s boom, arm, and bucket linkage to ensure system integrity.
-
Master the final calibration steps for your FJDynamics gps installation, from connecting to an RTK network to inputting your machine’s exact dimensions for centimetre-level accuracy.
-
Discover why professional installation is crucial for avoiding common sensor errors and how to pair it with NPORS-accredited operator training for maximum site safety and efficiency.
Table of Contents
What is FJDynamics GPS Installation for Excavators?
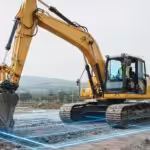
A FJDynamics GPS installation equips your excavator with a sophisticated retrofit 3D machine control system. This technology moves beyond traditional 2D laser levels by using advanced GNSS (Global Navigation Satellite System) and RTK (Real-Time Kinematic) technology to achieve centimetre-level digging accuracy. By referencing satellite constellations, including the well-known Global Positioning System (GPS), the system provides the operator with a real-time, 3D view of the bucket’s position relative to the site design.
For UK contractors, this shift from traditional methods to 3D machine control is a game-changer. It directly addresses key operational challenges by delivering significant, measurable improvements in efficiency and safety. The core benefits include:
-
Reduced Over-digging: Work precisely to the design grade, eliminating costly rework and saving on expensive backfill materials.
-
Lower Fuel Costs: Achieve the target depth and slope in fewer passes, which cuts down on machine hours, fuel consumption, and overall wear and tear.
-
Improved Site Safety: Minimises the need for a grade checker to work in close proximity to the excavator, reducing the risk of accidents on site.
One of the most compelling advantages of the FJDynamics gps installation is its broad compatibility. The system is designed to be retrofitted onto almost any machine, breathing new life and precision into older 360 excavators and integrating seamlessly with modern fleets.
The Components of the FJDynamics 3D System
The system’s precision comes from a combination of high-quality, rugged components working in unison. The main hardware includes:
-
Dual GNSS Antennas: Mounted on the excavator, these establish the machine’s exact position and heading on the site.
-
High-Precision IMU Sensors: These track the real-time angle and movement of the boom, arm, and bucket.
-
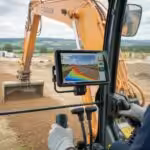
The 10.1-inch Control Terminal: Installed inside the cab, this rugged touchscreen tablet acts as the operator’s interface, displaying the design plans and bucket position.
Why Retrofitting Beats Buying New Integrated Machines
While factory-fitted GPS systems are available on new machines, retrofitting your existing fleet offers distinct advantages. This approach is highly cost-effective, allowing you to upgrade your current 360 excavators for a fraction of the cost of a new machine. The system is also portable and can be transferred between compatible machines, offering excellent flexibility. Finally, it allows operators to continue using the cabs they know and trust, reducing the learning curve and maintaining productivity.
Pre-Installation Checklist: Tools and Environment
A successful FJDynamics GPS installation depends entirely on diligent preparation. Before a single tool is picked up, taking the time to prepare your machine, workspace, and equipment ensures accuracy, safety, and operational efficiency. A precise setup is the foundation for effective construction machine control guidance , preventing costly rework and maximising your investment from day one. Always prioritise safety; this process involves working with heavy machinery and sensitive electronics.
Your pre-start check should cover three key areas: safety protocols, essential tools, and software readiness. Following these steps methodically will make the physical installation process significantly smoother.
- **Safety First:** Before starting, ensure the machine is parked on level ground, the parking brake is engaged, and the ignition is off with the keys removed. Isolate the machine using your company's lock-out/tag-out procedure. Safely ground all hydraulic attachments, like the bucket, to release any residual pressure.

- **Tool Requirements:** Gather all necessary tools. You will need a comprehensive metric socket and spanner set, a high-quality magnetic digital level for sensor alignment, a torque wrench for securing mounts to factory specifications, and consumables like cable ties and protective wiring loom.

- **Software Preparation:** Check the official FJDynamics support website for the latest firmware for your control box and GNSS receivers. Download this to a USB drive beforehand to avoid delays caused by poor internet connectivity on-site.
Site Conditions for Calibration
The environment where you perform the initial setup is critical for system accuracy. The ground must be completely flat and level, as this is the baseline for all sensor calibrations. Your chosen location must also have a clear, unobstructed view of the sky to acquire a strong GNSS satellite lock. Avoid working near high-voltage power lines, radio towers, or large metal buildings, which can cause signal interference and corrupt your calibration data.
Hardware Inspection
A thorough hardware check is a vital step in any professional FJDynamics gps installation. Unpack all components and verify them against the shipping manifest. Critically, confirm that the sensor mounting brackets are compatible with your specific machine model, as a bracket for a 20-tonne excavator will differ from one for a smaller unit. Lay out the wiring loom and check that the cable lengths are sufficient for the full articulation of the boom, stick, and bucket, preventing snags or damage during operation.
Step-by-Step FJDynamics Hardware Mounting
Correct hardware placement is the foundation of an accurate and reliable machine control system. This section provides a clear, step-by-step guide to mounting the components, ensuring your FJDynamics gps installation is both dependable and durable from day one. Follow these professional-standard procedures to guarantee optimal performance and safety.
The core installation process involves five key stages:
- **Step 1: Mount the GNSS Antennas.** Secure the dual GNSS antennas onto a stable, vibration-free surface with a clear view of the sky. The machine's counterweight or cab roof are ideal locations. Ensure they are positioned symmetrically for the most accurate heading information.

- **Step 2: Attach the IMU Sensors.** Fit the three high-precision IMU (Inertial Measurement Unit) sensors to the main moving parts: one on the boom, one on the arm (dipper), and one on the dog-bone or bucket linkage.

- **Step 3: Install the Terminal Display.** Inside the cab, install the control terminal using the supplied heavy-duty RAM mount. Position it for easy operator access and clear visibility without obstructing the view of the work area.

- **Step 4: Route the Wiring Harness.** Carefully route the main wiring harness from the antennas and sensors back to the terminal. Secure it along existing hydraulic lines using high-quality zip ties, leaving enough slack for full machine movement.

- **Step 5: Connect to Power.** Finally, connect the system to the machine’s power supply. The FJDynamics system is compatible with both 12V and 24V systems, making it suitable for almost any piece of plant machinery.
Sensor Placement Precision
Achieving sub-centimetre accuracy hinges on correct sensor placement. The sensor on the bucket linkage (dog-bone) is the most critical, as it directly measures the bucket’s angle and provides the final data for vertical accuracy. For permanent installations on rough terrain, welding the mounting plates is the most robust solution. Heavy-duty magnets offer flexibility but must be checked regularly. Always ensure each sensor is perfectly aligned with the centre-line of the component it is mounted on.
Cable Management for Heavy Plant
Protecting your wiring is paramount for system longevity. During your FJDynamics gps installation, identify and avoid all “pinch points” where cables could be crushed or sheared during boom and arm articulation. We strongly recommend using protective conduit for wiring in high-wear areas, especially near the bucket. To withstand the UK’s unpredictable climate, ensure all connections are tight and use the supplied weatherproof plugs to prevent water and dust ingress, which can lead to system failure.
Configuring Signals and Centimetre Calibration
Once the physical hardware is mounted, the next phase of your FJDynamics gps installation is to configure the software and calibrate the system to your specific machine. This is a critical stage where precision is established, ensuring every movement of the bucket is accurately tracked. Proper calibration is not just about performance; it’s a cornerstone of site safety and project compliance.
Setting Up RTK for UK Sites
To achieve centimetre-level accuracy, the system requires Real-Time Kinematic (RTK) corrections. In the UK, you have two primary options: using a dedicated FJDynamics base station on-site or connecting to an Ntrip network via a SIM card. A base station is ideal for large, long-term projects, while an Ntrip subscription offers flexibility for operators moving between sites. In remote areas like rural Gloucestershire or the Highlands, signal drop-outs can occur. Always ensure you have a reliable data provider to maintain the sub-3cm accuracy threshold essential for modern civil engineering projects.
The Excavator Dimension Input
The system’s accuracy depends on precise measurements of your excavator. Using a tape measure, you must input the exact dimensions into the control terminal with millimetre precision. Key measurements include:
-
Distance from the machine’s centre of rotation to the main boom pin.
-
Length of the boom and the stick (dipper arm).
-
Dimensions of the bucket, including tip-to-pin distance.
-
Offsets for any quick-hitch attachments.
It is vital to account for different buckets and hitches, as each will alter the final position of the cutting edge. Offset calibration is the process of aligning the digital bucket tip with the physical ground.
With the dimensions entered, the system requires both static and dynamic calibration. Static calibration verifies the angle sensors while the machine is stationary. Dynamic calibration is a crucial part of the FJDynamics gps installation, involving moving the boom, stick, and bucket through their full range of motion to teach the system precisely how all the components move together. This ensures the digital model perfectly mirrors the machine’s real-world articulation.
Finally, perform a “benchmark” test. Place the bucket tip on a known survey point and verify that the coordinates on your terminal match the benchmark’s coordinates within your project’s tolerance. This final check confirms your professional setup is complete and ready for safe, accurate work. For expert, hands-on training with machine control systems, visit us at vallyplanttraining.co.uk .
Professional Installation & Training with Vally Plant Training
While the FJDynamics system is designed for user-friendly operation, the initial setup is critical for achieving centimetre-level accuracy. A successful FJDynamics gps installation goes beyond simply mounting antennas; it requires precise calibration and expert knowledge to avoid common pitfalls like sensor alignment errors, which can compromise every job you do.
Choosing an expert dealer like Vally Plant Training ensures your investment performs flawlessly from day one. As a direct provider, not a broker, we offer a complete, transparent service that combines professional installation with accredited operator training.
The “Direct Provider” advantage means you benefit from:
-
Expert-Led Implementation: Our technicians are specialists in machine control systems, ensuring every component is calibrated for optimal performance on your specific machine.
-
No Hidden Fees: The price we quote is the price you pay. We believe in honest, transparent partnerships without the extra costs often added by middlemen.
-
Faster Support: As a family-run UK dealer, we provide a personal and responsive service. When you need support, you speak directly to the experts who installed your system.
Operator Proficiency: The Final Step
Technology is only as effective as the person using it. Our on-site training empowers your team to transition smoothly from traditional stakes and string lines to efficient, cab-only guidance. We focus on practical skills, teaching operators how to confidently read and utilise 3D design files (DXF/XML) directly on the FJD terminal. This not only boosts productivity but also enhances site safety. To fully leverage your new technology, consider complementing it with our NPORS-accredited 360 Excavator Training .
Nationwide Support and Maintenance
Our commitment to your success extends long after the initial installation. Based in Gloucestershire, Vally Plant Training provides on-site visits and support across the UK. We offer annual system health checks and assistance with firmware updates to keep your equipment running at peak efficiency. We are your long-term partner in precision construction, dedicated to helping you maximise your return on investment.
Ready to upgrade your fleet with precision and confidence? Contact Vally Plant Training for FJDynamics Sales & Installation today and experience the difference of working with a trusted, direct provider.
Unlock Precision with Professional FJDynamics GPS Installation
This guide has demonstrated the transformative power of centimetre-accurate GPS for your excavator. A successful FJDynamics gps installation hinges on meticulous preparation, correct hardware mounting, and precise calibration. While a DIY approach is feasible, professional installation and accredited training are the keys to unlocking the system’s full potential, ensuring maximum return on your investment from day one.
Don’t leave performance to chance. As an official UK FJDynamics Dealer and a trusted, NPORS Accredited Training Centre, Vally Plant Training provides an end-to-end solution. Our family-run business offers dependable, nationwide site support to ensure your operators are fully certified and confident with the new technology.
Ready to enhance your fleet’s efficiency and accuracy for 2026 and beyond? Enquire About FJDynamics GPS Installation & Training today and take the first step towards smarter, safer, and more profitable operations.
Frequently Asked Questions About FJDynamics GPS Installation
Can FJDynamics GPS be installed on any make of excavator?
Yes, the FJDynamics system is designed for broad compatibility and can be professionally installed on virtually any make and model of excavator, including popular brands like Caterpillar, Komatsu, Hitachi, and JCB. The system integrates with the machine’s hydraulic controls, making it a versatile solution for upgrading a mixed fleet. Our certified technicians ensure the installation is tailored precisely to your specific machine for optimal performance and accuracy, regardless of its age or manufacturer.
How long does a typical FJDynamics GPS installation take?
A professional FJDynamics GPS installation by a certified Vally Plant Training technician typically takes between 4 to 6 hours. This timeframe includes the physical mounting of all components, such as the control box, antennas, and sensors, as well as the crucial calibration process. We work efficiently to minimise your machine’s downtime, ensuring your excavator is back on the job and operating with enhanced precision as quickly as possible, fully tested and ready for work.
Do I need a base station for the system to work in the UK?
For centimetre-level accuracy (RTK), the system requires a correction signal. In the UK, you have two primary options. You can use a physical base station on-site, which is ideal for large, long-term projects. Alternatively, and more commonly for varied site work, you can connect to an NTRIP network via the system’s built-in 4G modem. This network provides RTK corrections from a grid of established base stations, offering excellent coverage across most of the UK.
Is the FJDynamics system waterproof for UK winter conditions?
Absolutely. The FJDynamics system is built to withstand the demanding conditions of UK construction sites, including harsh winter weather. Key external components, such as the GNSS antennas and sensors, typically carry an IP67 rating. This means they are fully protected against dust ingress and can withstand immersion in water up to one metre deep. You can operate with confidence through rain, sleet, and snow, knowing the equipment is both durable and dependable.
Can I move the GPS system from one excavator to another?
Yes, the FJDynamics system is designed to be transferable. The main components like the control box, display, and GNSS receivers can be moved between machines. However, each new installation requires a specific mounting kit and, most importantly, must be professionally recalibrated to the exact dimensions of the new excavator. This ensures that the system’s accuracy is maintained. Our technicians can create multiple machine profiles to make switching between pre-calibrated machines more efficient.
What is the difference between 2D and 3D machine control installation?
A 2D system controls the bucket’s depth and slope in relation to a laser reference or a known benchmark, ideal for tasks like grading flat pads or digging trenches. A 3D system uses dual GNSS antennas to know the machine’s exact position, heading, and orientation on a digital site model. This allows the operator to excavate complex designs, such as contours and multi-slope surfaces, directly from the design file without needing stakes or stringlines.
Does Vally Plant Training provide operator training after installation?
Yes, we do. At Vally Plant Training, we believe a system is only as good as its operator. Following every installation, we provide comprehensive, NPORS-accredited operator training. Our expert instructors ensure your team is not just familiar with the buttons but is fully competent and confident in using the system to its maximum potential. This focus on certified training guarantees you achieve the highest levels of safety, efficiency, and return on your investment.
How much does professional FJDynamics installation cost in 2026?
While pricing is subject to change, as a guideline for 2026, you can expect professional installation services to range from £700 to £1,300. This cost is separate from the hardware itself and can vary based on the complexity of the machine, whether it is a 2D or 3D system, and site location. For a precise and transparent quote with no hidden fees, we recommend you contact us directly. We provide a fully costed plan tailored to your specific requirements.
Related Posts